Like all mechanical components, your chainsaw guide bar wears in use. But unlike chain wear which is very obvious in the chain getting dull, bar wear is slower and less obvious.
But when serious enough, bar wear will start giving you a lot of trouble: the bar throws the chain, cuts crooked, saw feels under-powered, among other issues.
So how do you tell if your bar is worn? And what to do about it?
In this article, I tell you how to spot chainsaw bar wear, how to reduce the wear rate, and how you can in some cases service a worn bar to extend its life. In short, chainsaw bars wear mainly in the bar rails, which can develop local dips or wire edges or widen in the groove. Bar wear cannot be prevented, but the wear rate can be reduced by using sufficient chain tension, ensuring proper oiling, flipping the bar upside down periodically, or by swapping the nose. Some forms of wear can be compensated by grinding or bending the rails, but a severely worn bar must be replaced.
If you have some bars that have seen some serious use, I recommend checking them for wear with the instructions in this article. Acting early on problematic spots will save you bars and money!
Types of bar wear
The most common forms of bar wear can be broken to three types: dips in the rails, wire edges and groove widening.
All of these wear types occur on the bar rails. The rails are the dual steel faces around the bar perimeter on which the chain rides.
The rails wear because they take the cutting pressure loads and are in constant sliding contact with the chain. Some bars have hardened rails and last longer, but all will eventually start to wear.
Next we’ll discuss each wear type in turn.
Type 1: Dips in the rails
Dips in the rails is an easy-to-spot type of bar wear: the outline of the bar is no longer smooth but has shallow holes and bumps like a bumpy road.
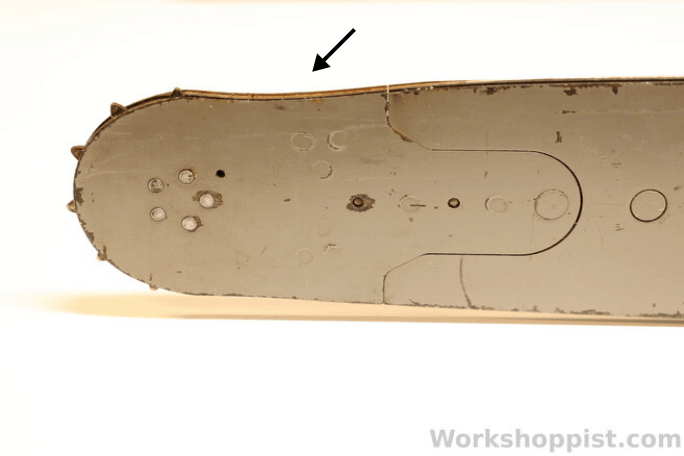
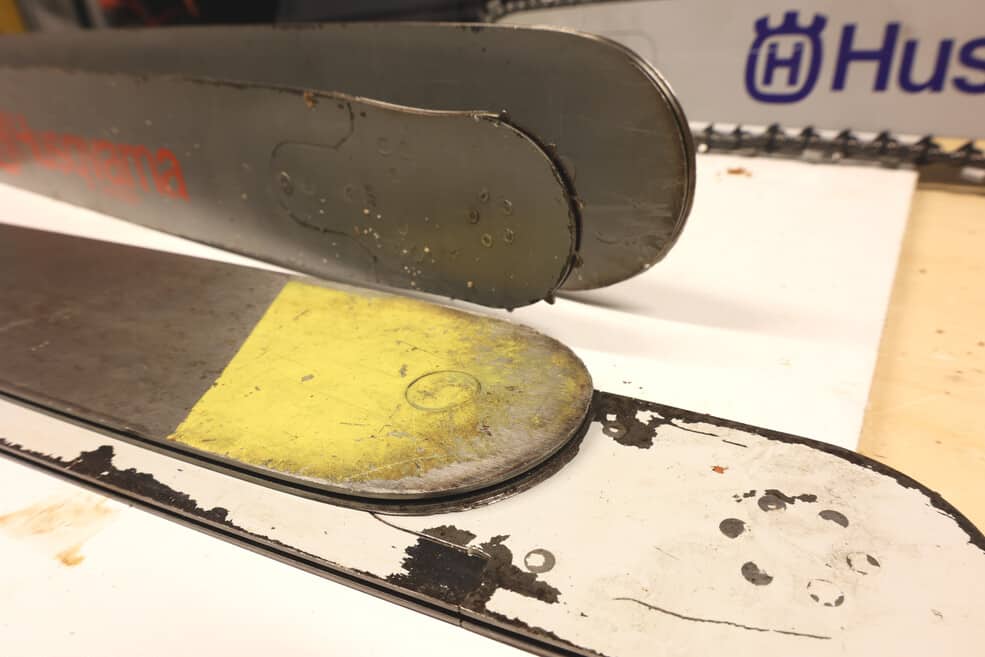
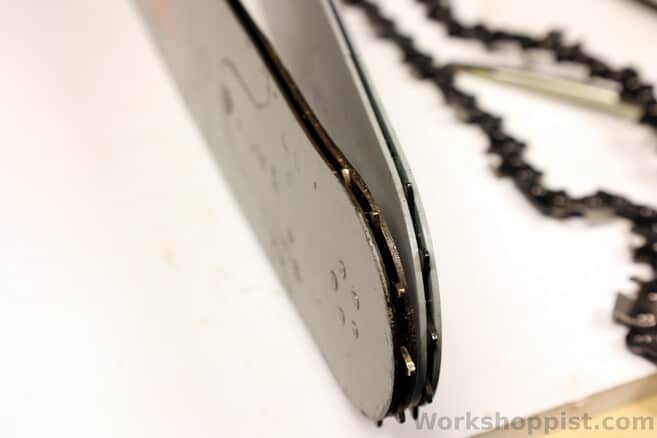
How to spot: Look for uneven spots in the bar outline. If possible, lay the bar on a similar new bar – this is particularly useful for inspecting the tail. If you have a chain on the bar, see where the chain is not sitting on the bar
Where: These dips usually develop near the bar tip and tail where the chain goes around a tight bend. The reason to this is chain dynamics: the fast moving chain would like to run on a wavy trajectory before and after the turn and puts pressure on the bar rails. A dip is most likely on the underside of the bar tip, where a local limbing pressure hot spot adds to the chain dynamic load.
How to reduce: Dip-type bar wear cannot be completely prevented, but the wear rate can be reduced by a number of measures.
- Enough chain tension: running your chain tight enough reduces the chain waviness.
- Proper oiling: having sufficient chain oiler flow keeps the bar lubricated and the wear rate low
- Flip the bar: since this type of bar wear is asymmetric, you can even out the effects by periodically flipping the bar upside down.
- Change the nose: replaceable-nose bars allow you to swap the nose, which usually experiences the heaviest dip wear.
How to repair: Repairing this type of wear is difficult. Dips near the bar tail may be smoothed out by grinding, but this rarely helps. Dips near the bar tip, on the other hand, cannot be ground away, since the nose sprocket fixes the chain height – hard nose bars (link to my article) are the only exception. Replacing the bar is the only fix to serious dip-type wear.
Type 2: Wire edges
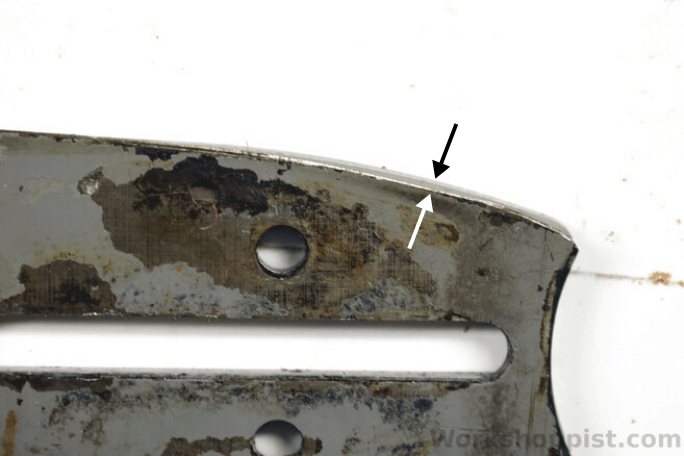
Another form of bar wear, also in the rails, is the forming of wire edges. Wire edges are thin “lips” of steel on the rail edges that are formed by the chain eating itself into the rails in the middle, but leaving a thin strip of material untouched. Wire edges may also bend outwards.
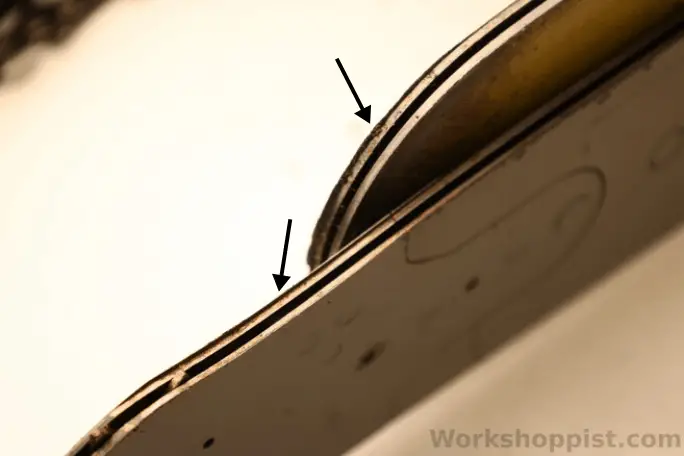
How to spot: Wire edges are easy to see – just look for sharp knife-like strips of metal near the outboard edges of the rails.
Where: Wire edges often develop all around the bar, but are worst near the bar tip and tail where the dip-type wear is heaviest too.
How to reduce: Wire edges cannot be prevented, but their development can be slowed down by the same means as dip-type wear: enough chain tension and oil, flipping the bar and swapping the nose.
How to repair: Wire edges are easy to fix by “dressing” the bar, i.e. grinding the edges away. This can be done a powered grinder and a jig, a grind stone and guide, or even a flat file or some sand paper. What’s essential is getting the rails ground exactly square to the bar side and deburring from the side after finishing.
Type 3: Widening groove
A third type of bar wear is widening of the bar groove. This wear is due to chain drive link tangs rubbing the inside surfaces of the rails.
How to spot: This type of wear is difficult to see directly than the dips or the wire edges. But is easy to feel: on a worn bar, the chain has sideways play when you push the teeth.
Where: Groove widening happens all around the bar, but the tip and the tail wear the fastest.
How to reduce: Keeping the chain well-oiled is the best way to prevent groove widening wear. Like others, this type of wear may be a bit asymmetric, so flipping the bar does not hurt.
How to repair: Groove widening through wear can be compensated by bending the rails back in, which can be done with pliers, in a vice or by hammering. Use of a shim piece is recommended to avoid closing the groove too much.
How to reduce bar wear?
The best way to reduce all types of bar wear is to keep the chain properly tensioned and well-oiled. Bar life can also be extended by flipping the bar or swapping the nose.
Chain tension
Maintaining chain tension means two things: you should avoid excessive tension as this puts pressure on the rails in the bar tail, and with hard-nose bars also in the nose. But you should also avoid too low chain tension as this will promote dip-type wear due to chain dynamics at the tip and tail.
Oiling
Oiling of the chain and bar is taken care of by the oil pump in your saw. Your task is to set the oil pump to provide sufficient oil flow into the bar so that the chain stays well-lubricated.
Bar flipping
A popular pro-trick to counter bar wear is to flip the guide bar upside down in the saw. This trick relies on asymmetry of the wearing: the bar underside wears faster than the top.
Flipping the bar does not actually reduce the wear rate, but it evens out the wearing so that no spot wears too much faster than others.
Swapping the nose
Many pro-grade bars come with a replaceable nose section. This is very handy since the nose often experiences the fastest wear, and swapping it for a fresh one can extend the bar’s life by many times.
When should a bar be replaced?
Some amount of rail wear can be dealt with by regrinding the bar. However, a chainsaw guide bar must be replaced due to wear when the rails have worn down too deep at any spot in the bar.
The wear is too deep when the tangs of the chain drive links touch the groove bottom. At this point, grinding the bar no longer helps, as you are out of rail height.
The worst wear is usually to be found near the bar nose or tail. This breaks the replacement consideration to cases:
Case 1: Worn nose
Replaceable-nose bars: If the nose is worn and the bar is of the replaceable-nose type, consider swapping the nose only. This may save you up to $150 with long bars.
Fixed sprocket nose bars: If the bar nose shows dip wear and is a regular sprocket nose, you should replace the bar. The dip cannot be ground away since the sprocket sets the chain height around the nose area.
Hard-nose bars: A worn hard-nose bar can usually be repaired at least once by regrinding it all around the nose. Make sure that you have enough clearance from the groove bottom, though, and be prepared to shorten the chain (a regrind reduces the nose radius).
Case 2: Worn tail
Small amounts of tail wear are usually not an issue, but serious wear may show up as the saw throwing the chain. At this point, you should usually replace the bar.
The tail can sometimes be repaired by regrinding narrower, and ran with a shorter chain to retain proper entrance angle with the new narrower tail. Doing this is tricky; attempt only if you are confident you can check the new chainline.